
White Balance
White Balance removes color casts, so whites look white and skin looks natural. Raw files let you change it freely, with no loss of quality.
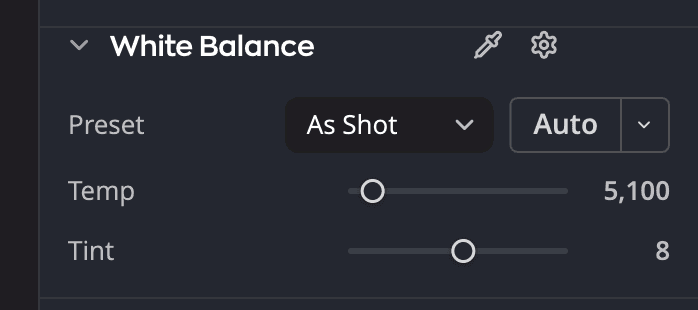
| # | Control | What it does |
|---|---|---|
| 1 | Temp | Moves the color from blue to yellow |
| 2 | Tint | Moves the color from green to magenta |
| 3 | White balance eyedropper | Click it, then click something in the photo that should be neutral gray or white. |
Choose a preset
Pick the light the photo was taken in.
| Preset | Use it for |
|---|---|
| As Shot | The camera's own setting. Every photo starts here. |
| Auto | Radiant Raw's best guess for this photo |
| Daylight, Cloudy, Shade | Outdoor light |
| Tungsten, Fluorescent | Indoor lamps |
| Flash | Flash photos |
| Custom | Shown when you set Temp or Tint yourself. You can't pick it from the list. |
Set it with the eyedropper
- Click the White balance eyedropper.
- Click something in the photo that should be neutral gray or white.
- Radiant Raw sets Temp and Tint, and the eyedropper puts itself away. To cancel before you click, press Esc or click the eyedropper again.
Fine-tune
| Slider | Range | What it does |
|---|---|---|
| Temp | 2000 to 50000 K | Moves the color from blue (lower) to yellow (higher) |
| Tint | −150 to +150 | Moves the color from green to magenta |
Both sliders reset to the photo's As Shot values, not to a fixed number.
How Auto measures
The Auto button sits beside the preset. Click the ▾ on it to open the Auto white balance method menu. Each method row says what the method does on a dim second line. Point at a row, or move to it with the arrow keys, and a tooltip opens beside the menu. It says more about what the method does, then what it's best for, then when it holds back. What Auto tells you below has more on that.
| Method | Second line | Best for |
|---|---|---|
| Neutral areas | Turns the near-gray areas gray | Best for scenes with something white or gray in them |
| Edges and detail | Turns edges and detail neutral | Best for scenes with little gray, such as foliage or water |
You can also choose Develop > White Balance Auto, or press ⇧⌘U (Ctrl+Shift+U on Windows). It does what the Auto button does.
Choosing a method runs it once. Click its pin, Set as default, to make Auto use it every time.
Rest the pointer on a method row, or move to it with the arrow keys, to preview it. The photo then shows what a click would do, under the chip Preview · Neutral areas. Nothing changes until you click. Once the row that isn't your default has previewed, it may show Warmer, Cooler or Same picture at its right, compared with your default. A row whose click would change nothing, or leave the photo as it was, shows no preview. See Preview a method before you click for how the preview works.
To see both methods' results side by side, choose Compare Methods… at the foot of the ▾. See Compare every method side by side.
Auto measures the photo as shot, so it lands on the same values whichever preset you start from.
Run Auto once with a goal
Under the methods in the ▾, Goal opens the Auto white balance goal menu. Click a goal to run Auto once with it, by your default method, in one undo step.
| Goal | Second line | Best for |
|---|---|---|
| Neutral | Takes out the whole color cast | Best for most photos |
| Keep the light's color | Takes out about half of the cast | Best for sunsets, candlelight and stage light |
Neutral is the same as clicking Auto. Keep the light's color leaves some of the light's color in the photo. Its message names the goal, for example White Balance Auto, Keep the light's color: 4,100 K, Tint +6. Point at it to see the method and why part of the cast stays, or click Undo in it. The preset then reads Auto, and Cooler and Warmer step from this result.
Goals preview like the method rows, compared with Neutral. A goal is never saved as your default, so the next click on Auto runs Neutral again.
What Auto tells you
When Auto is done, a message over the photo gives the values and the method, for example White Balance Auto: 6,400 K, Tint 0 (Neutral areas). Click Undo in it to go back. See When you click Auto.
- When a photo has few neutral areas, Neutral areas takes out only part of the cast, because the color may be the light of the scene, such as a sunset. The message then reads White Balance Auto: cast partly corrected, 4,800 K, Tint +6 (Neutral areas). Point at it to read why.
- When nothing in the photo is neutral, Neutral areas leaves White Balance as it was and says White Balance Auto: left the photo as it was. Click Try Edges and detail in the message to try the other method once. Your default stays as it was.
- When a single color fills the photo, Edges and detail has nothing to measure, so Radiant Raw leaves White Balance as it is. Point at the message to read why.
Step it cooler or warmer
Under the preset are two small buttons, Cooler and Warmer. They work while the preset reads Auto, so click Auto first. Each click sets Temp one step cooler or warmer than Auto measured. A step is about 250 K in daylight. Tint stays as it is. You can go three steps each way. Cooler and then Warmer brings back what Auto measured.
The preset still reads Auto after a step. Move Temp or Tint yourself, and it reads Custom. The buttons are then dimmed until you click Auto again. They also wait while Auto is still measuring. A dimmed button tells you why when you point at it.
Each click is one undo step, with a message over the photo, for example White Balance Auto, Warmer: 5,753 K, Tint 0. Point at it to see how far you are from what Auto measured, for example One step warmer than White Balance Auto measured (5,500 K). Click Undo in it to take the step back. Like Tone's step buttons, these have no keyboard shortcuts until you set one. See Step Auto's result.
White Balance Auto after Levels or Curves Auto
Levels' or Curves' Auto can take out a color cast too, with Enhanced Contrast Per Channel or with Neutral Midtone Snapping on. When you click White Balance's Auto after one of them, White Balance takes out the cast itself. Then that Auto runs again over the new white balance. It all comes back with one Undo. While one of those Autos is on the photo, White Balance's ▾ rows don't preview.