
Levels
Levels sets the darkest, middle and lightest points of your photo, for all channels together or for red, green and blue one at a time. It's the classic way to set black and white points and remove a color cast.
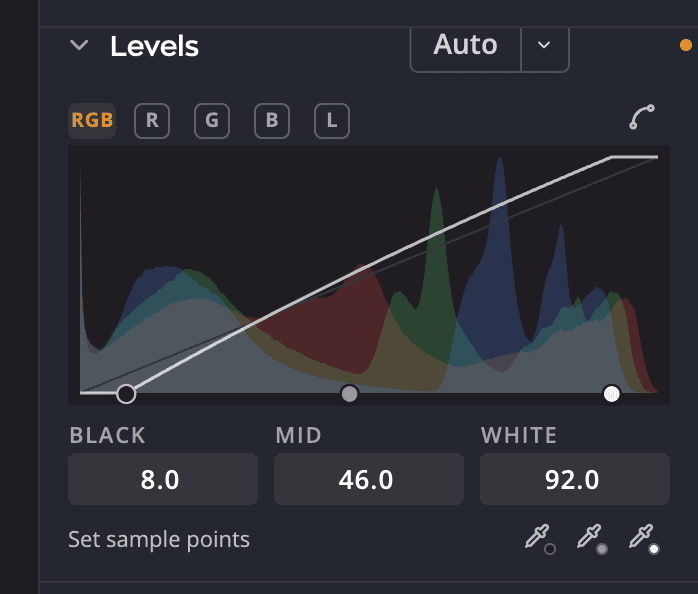
| # | Control | What it does |
|---|---|---|
| 1 | Channel chips | All channels, Red channel, Green channel, Blue channel or Luminosity |
| 2 | Plot and pins | The histogram with three pins: Black, Mid and White |
| 3 | Set sample points | Three eyedroppers that set the black, gray and white points from the photo |
| 4 | Auto | Sets the pins for you with your chosen method |
| 5 | Ramp corner smoothing | Rounds off the corners at the black and white points for a softer roll-off. Click it again for hard corners. |
Set the pins
- Choose a channel chip. All channels moves red, green and blue together. Luminosity changes brightness only, applied equally to red, green and blue.
- Drag the Black pin in from the left until the darkest tones are as dark as you want.
- Drag the White pin in from the right for the lightest tones.
- Drag Mid to make the midtones lighter or darker.
To see where the photo clips as you set the end points, hold ⌥ (Alt on Windows) while you drag the Black or White pin. Clipped areas show in the color of the channel that clips: white where all three channels blow out, and black where all three go to black. Let go of ⌥ or the mouse to clear it.
You can also drag the plot itself, or type a value from 0 to 100 in the Black, Mid and White fields under it. Each channel keeps its own pins, so you can set red, green and blue separately to correct a color cast.
On the All channels chip, an output bar and two more fields under the pin fields set the output range for all channels together. Output Black (0 to 100, default 0) lifts the darkest tones, and Output White (0 to 100, default 100) pulls the brightest tones down. Drag their pins on the bar or type a value. They don't show on a single color channel or on Luminosity.
Set points from the photo
Under Set sample points, click an eyedropper, then click the photo:
| Eyedropper | Click on |
|---|---|
| Set black point | Something that should be pure black |
| Set gray point | Something that should be neutral gray. This removes a color cast. |
| Set white point | Something that should be pure white |
As you hover, the readout shows the value a click will use, on the same 0 to 100 scale as the pins, for example Gray 48.6 · click to set. Press Esc to cancel. The eyedroppers average the pixels set by Eyedropper sample size in Settings > Develop.
Let Auto set the pins
Auto has two parts:
- Click Auto to apply your default method, in one undo step. Its tooltip names the method.
- Click the ▾ beside it to choose a method from the table below. Choosing one makes it the default and runs it once. A check marks the default.
At first, Auto uses Enhanced Contrast. It sets the pins on the Luminosity chip, so it changes contrast and keeps the colors as they are. Enhanced Contrast and Brightness is in the ▾ too. It sets the Tone sliders, as Tone's Auto does, and leaves the pins where they are.
Luma sets the darkest, middle and lightest points from the photo's overall brightness.
Each method row in the ▾ says what the method does on a dim second line. Point at a row, or move to it with the arrow keys, and a tooltip opens beside the menu. It says more about what the method does, then what it's best for. Some tooltips also say what to watch for.
| Method | Second line | Best for |
|---|---|---|
| Luma | Sets the luminance pins from black to white | Best for a photo whose color is right but looks flat |
| Enhanced Contrast | Sets one black and white point for all colors | Best for haze, fog and flat light |
| Enhanced Contrast Per Channel | Stretches red, green and blue each on its own | Best for a strong color cast, as in scans or underwater |
| Push to Dark and Light | Sets each color from its dark and light areas | Best for a cast you can see in the shadows and highlights |
| Enhanced Contrast and Brightness | Sets Exposure, Contrast and the Tone sliders | Best for most photos, as a first step |
The tooltips of Luma and Enhanced Contrast end with Leaves a color cast as it is. The tooltip of Enhanced Contrast and Brightness ends with Exposure holds back when the photo looks dark on purpose or the highlights would clip.
Rest the pointer on any method in the ▾, or move to it with the arrow keys, to preview it. The photo then shows what a click would do, under the chip Preview · Luma. The preview uses the options under the methods as they stand, such as Neutral Midtone Snapping. Nothing changes until you click. Hold ⌥ (Alt on Windows) to see your photo without the preview, or press Esc to close the menu and end it. Once a method has previewed, a word at its right may say how its picture differs from the default's, such as More contrast. See Preview a method before you click for how the preview works.
To see every method's result side by side, choose Compare Methods… at the foot of the ▾. See Compare every method side by side.
When Auto is done, a message over the photo names the method, for example Levels Auto: set by Enhanced Contrast. Point at it to see where the pins landed, or click Undo in it to take the Auto back. See When you click Auto.
The methods that set the pins measure the photo as it looks now, with your other edits. Clicking Auto twice gives the same result: the second click finds nothing to change. Each Levels Auto replaces the last one. A method that sets the pins leaves what Tone's Auto set as it is, so you can use both. If you click Tone's Auto or Auto Exposure after a Levels Auto, the Levels Auto runs again with its method on the new picture, in the same undo step. So the order of your clicks doesn't change the picture.
Auto Color Correction Options
⌥-click Auto (Alt-click on Windows) to open Auto Color Correction. Each choice previews live on the photo.
| Method | What it does |
|---|---|
| Enhanced Contrast | Clips every channel the same amount, so highlights get lighter and shadows darker while colors keep their relationship |
| Enhanced Contrast Per Channel | Stretches each channel separately for a stronger correction. It may remove or add a color cast. |
| Push to Dark and Light | Uses the average lightest and darkest colors as the end points, for the most contrast with the least clipping |
| Enhanced Contrast and Brightness | Balances brightness and contrast together, based on the photo. It sets the Tone sliders, not the pins. |
Levels' dialog and Curves' dialog both list all four.
- Neutral Midtone Snapping also shifts the midtones so a near-neutral color reads neutral gray. It isn't available with Enhanced Contrast.
- Keep brightness keeps the midtones' brightness while snapping takes out the cast. It needs Neutral Midtone Snapping on.
- Turn on Save as defaults to make your choice what Levels' Auto applies from now on.
Click OK to keep the preview as one undo step, or Cancel to put the photo back as it was.

Tip
You can also set the default methods in Settings > Develop > Auto Color and Auto Tone.